It feels like M.2 HATs may become the new Pi 5 case for me in terms of releasing multiple reviews in succession but it is what it is, and the delivery Gods dictate when packages arrive, not me! That said, they dropped the HackerGadgets M.2 HAT on my doorstep recently and I was curious to see how it matched up against the official Raspberry Pi M.2 HAT+ that I’d just tested.
HackerGadgets is a small outfit based in China and unlike some of the others I’ve seen dumped into the market, some actual thought has been put into this. Whilst installing and testing, I repeatedly thought “Why didn’t Raspberry Pi do this themselves?” Let’s get into that and find out why.
How is this different to the Raspberry Pi M.2 HAT+?
This is probably going to be one of the first questions you have, and it’s a rather good one. It’s also one that I’m pleased to point out given how fresh my memories of the Raspberry Pi version are.
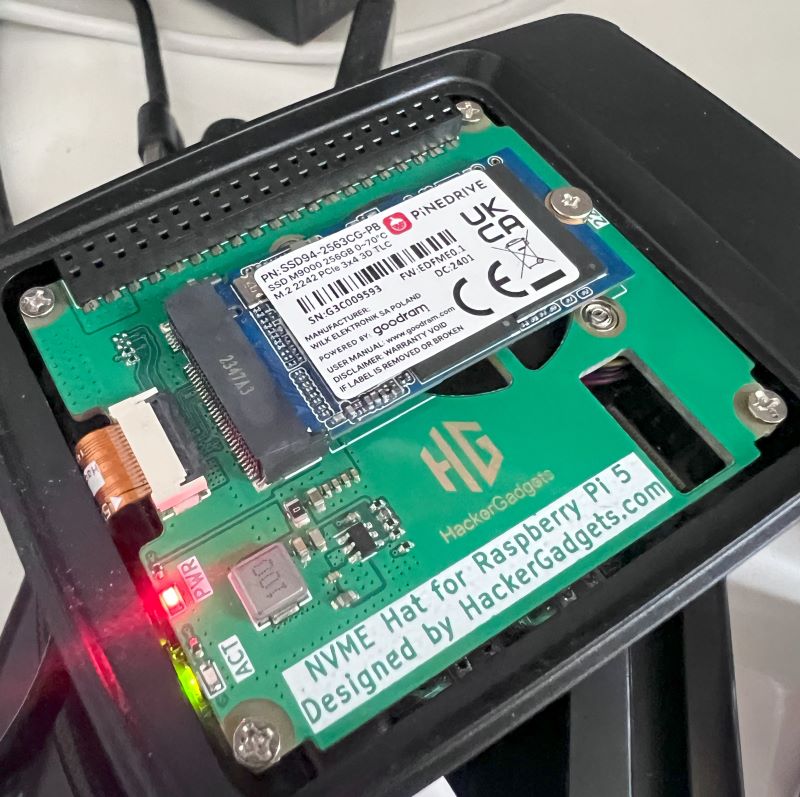
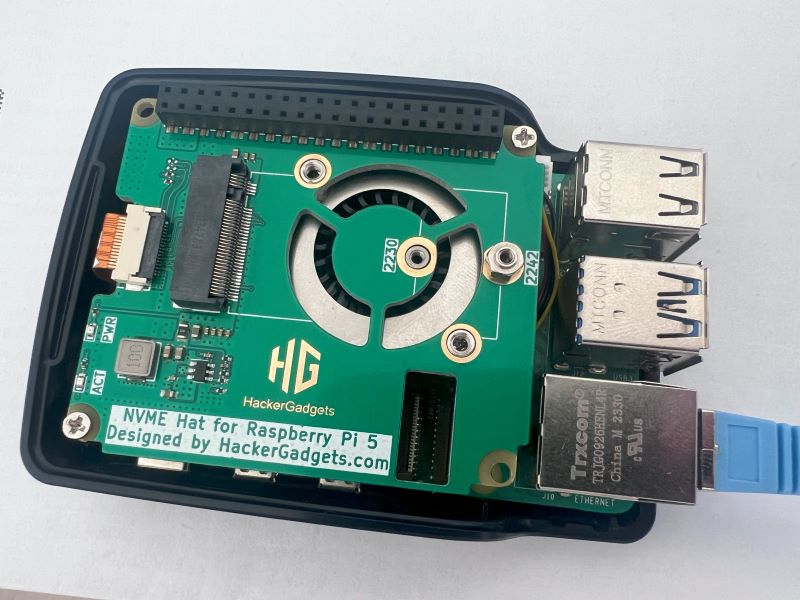
On the surface, it’s another M.2 HAT supporting 2230/2242 length M.2 NVMe SSDs, with cutouts for the camera cables and a GPIO pass-through. The big difference here, however, is that if you look closely at the corners, you’ll see that they’ve been trimmed back so that you can utilise the lid of the Raspberry Pi 5 case (for better or worse).
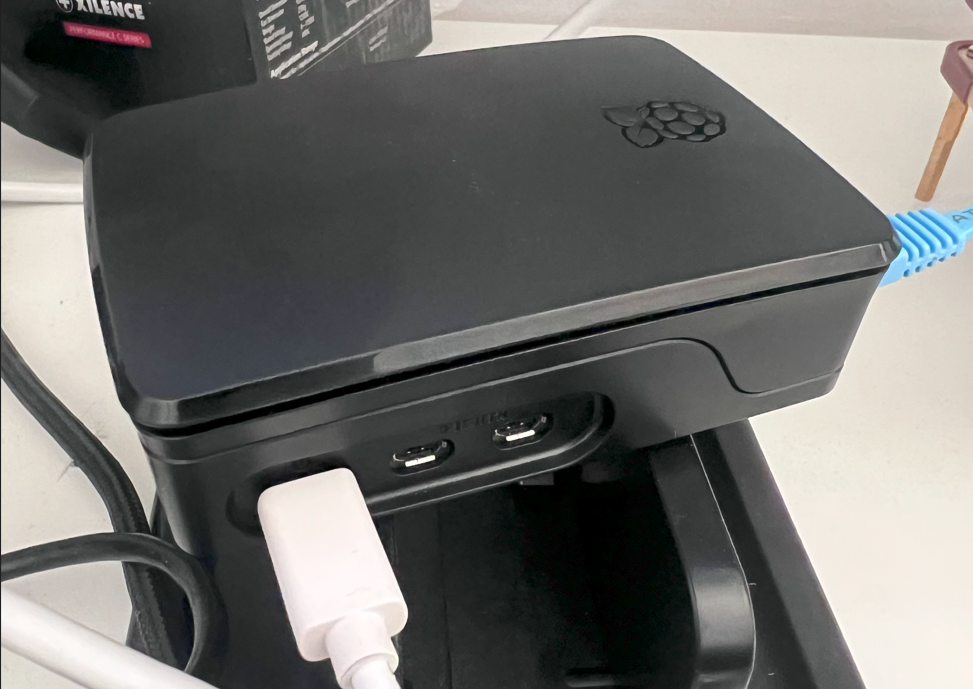 You’re going to have to trust me that there’s an M.2 HAT and NVMe drive under here
In addition, you’ll see the big cutout below where the M.2 drive mounts (there’s just over 4mm of clearance for those wondering) which is for a fan. No fan is included with the HAT but that’s fine because it now means, unlike the official HAT+ offering, you don’t have to discard the case fan! You can mount it on the underside of the board and allow things to breathe. If instead, you choose to use the active cooler, the hole lines up perfectly with that so it does the same job.
The 2 above points are what made me wonder why Raspberry Pi didn’t think of this themselves. It’s a minor change but one that would have greatly benefited their users in my opinion. Or maybe they did and there was a technical reason behind it. Weaker corners so worries of users damaging them perhaps?
One thing I should point out though is that this is not a HAT+ compliant Raspberry Pi HAT so do keep that in mind when making your decision to purchase if that’s important to you.
Assembling the HackerGadgets M.2 HAT
Assembly was straightforward, with all-metal mounting/fastening hardware which were quick and easy to put together. There are some additional standoffs if you want to stack anything on top, though note that a GPIO extension is not included in the package. You also get 2 slightly longer screws (bottom right in the below photo) which are used for mounting the Pi 5’s case fan to the underside if desired.
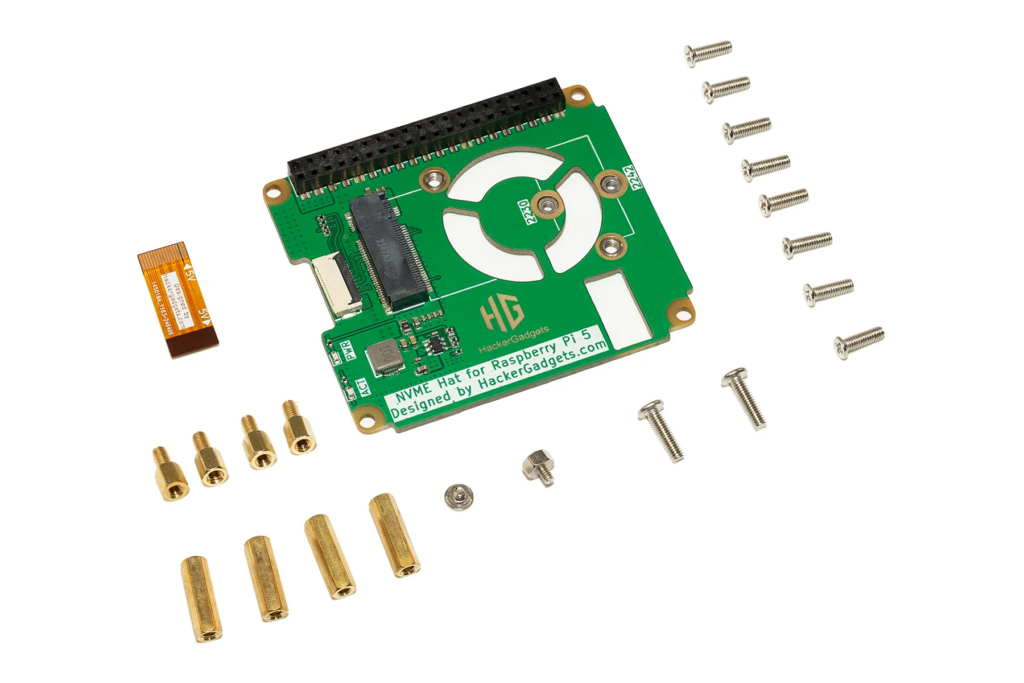
The included PCIe cable is pre-installed into the HAT on delivery and it can only be connected in one way on the Pi 5’s side so that’s nice and eradicates potential shorting issues.
Want to know what else is nice? The included screws are long enough to go through the Raspberry Pi 5 case and into the spacers/standoffs. Again, I know Raspberry Pi didn’t explicitly state that their HAT was compatible on their final product page but it could have been a nice bonus!
Testing the HackerGadgets M.2 HAT+
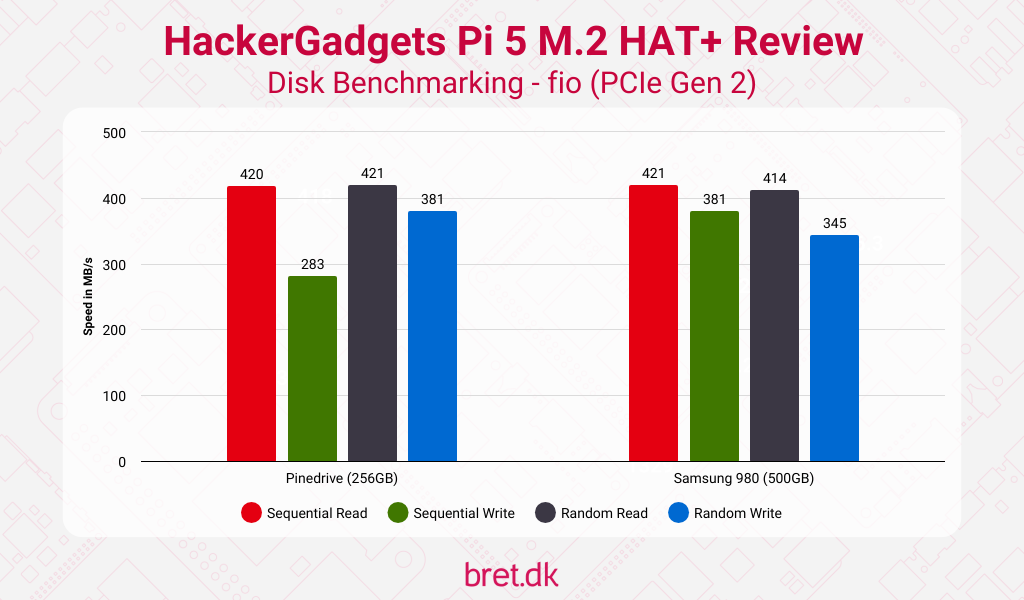
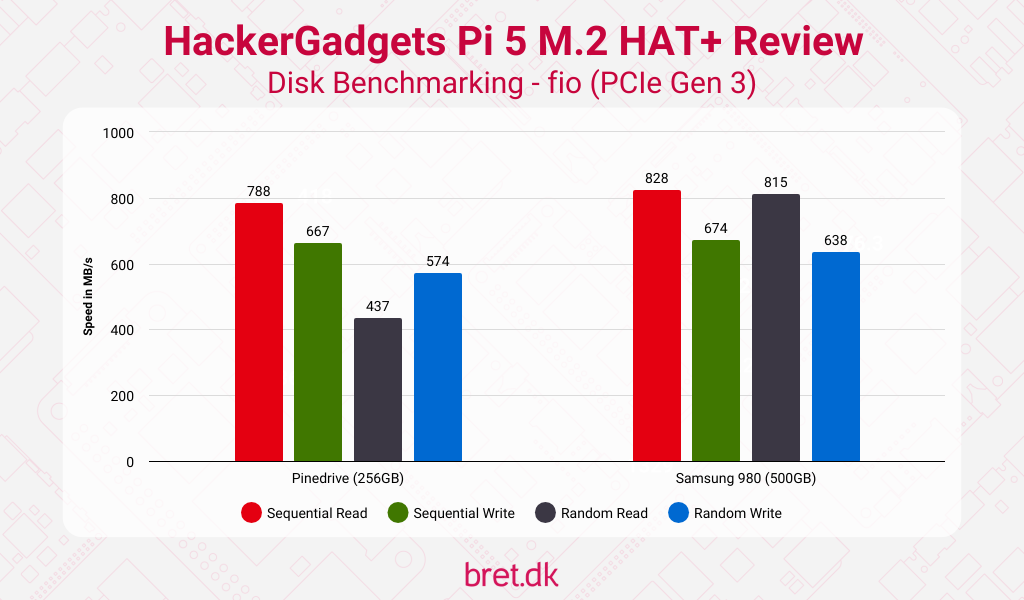
Right then, here we are again. On the disk throughput front, we’re going with the 256GB Pinedrive from Pineboards again, and the 500GB Samsung 980. Both are DRAM-less drives but should have no problem maxing out a single lane of PCIe Gen 2 (and 3!)
HackerGadgets Raspberry Pi M.2 HAT Disk Benchmarks
fio
Let’s roll with the same fio --randrepeat=1 --ioengine=libaio --direct=1 --gtod_reduce=1 --filename=test --bs=4k --iodepth=64 --size=5G --readwrite=X test which tests with a 4KB block size. If you want to emulate the test, replace X with read, write, randread, randwrite for the same sequential/random read and write tests on your device.
PCIe Gen 2
PCIe Gen 3
iozone3
iozone3 tests run through various block sizes (from 4KB to 16MB), with sequential reads, writes, and random reads and writes tested. The command it uses is iozone -e -I -a -s 5G -r 4k -r 16k -r 512k -r 1024k -r 16384k -i 0 -i 1 -i 2 if you wish to compare. This section only contains Pinedrive data.
PCIe Gen 2
| 4 | 59.96 | 221.07 | 60.01 | 217.81 |
| 16 | 219.29 | 313.78 | 219.44 | 317.73 |
| 512 | 428.20 | 391.63 | 428.13 | 398.13 |
| 1024 | 432.28 | 400.27 | 432.24 | 393.48 |
| 16384 | 436.06 | 402.43 | 436.07 | 401.55 |
PCIe Gen 3
| 4 | 65.26 | 308.11 | 64.62 | 303.85 |
| 16 | 236.68 | 526.41 | 236.79 | 522.37 |
| 512 | 823.75 | 768.42 | 823.23 | 760.94 |
| 1024 | 839.01 | 729.30 | 838.60 | 771.78 |
| 16384 | 853.08 | 776.56 | 852.55 | 739.26 |
Temperatures in Various Situations
This section was a little hectic even on the Raspberry Pi M.2 HAT review, but to compare the 2, I thought it was wise to leave the same data points in. This does mean we have an even larger amount of data now we add HackerGadgets’ data on top of that, but I’ve tried to make it a little clearer. For additional help, I’ve clarified the labels on the graph below. Oh, and as usual, these tests are all with the performance CPU governor. If you’re using the default ondemand governor, your temperatures will be slightly lower due to a lower power draw.
Bare Pi 5: This is just the Raspberry Pi 5 alone with no case or cooling.
Bare Pi 5 with RPi HAT: We’re just adding the Raspberry Pi M.2 HAT+ on top of the bare Pi 5 for this.
Case: No HAT, just the Raspberry Pi 5 in its official case with the included heatsink and fan.
Case with RPi HAT: Now we’ve added the hat, this data point is for a bare Raspberry Pi 5 with the official HAT attached inside the case.
Active Cooler: This is the Raspberry Pi 5 with the official Active Cooler attached, no case, no HAT.
Active Cooler in Case with RPi HAT We’re now using the Active Cooler on the Raspberry Pi 5, in the case, with the official HAT attached.
Heatsink in Case with RPi HAT: Raspberry Pi 5 fitted with the heatsink from the official case, with the M.2 HAT installed.
Heatsink in Case with HG HAT, Fan & Lid: Raspberry Pi 5 fitted with the heatsink from the official case, along with the case fan, and the case’s lid attached above the HackerGadgets HAT.
Case with HG HAT: Raspberry Pi 5 with the HackerGadgets HAT mounted, no heatsink, fan, or lid on the case.
Heatsink in Case with HG HAT, Fan & Lid: The Pi 5 with the fan and heatsink in the official case, with the HackerGadgets HAT, and the case’s lid is on.
Active Cooler in Case with HG HAT: Finally, the Pi 5 in the official case with the lid on, cooled by the Raspberry Pi Active Cooler with a HackerGadgets HAT above it.
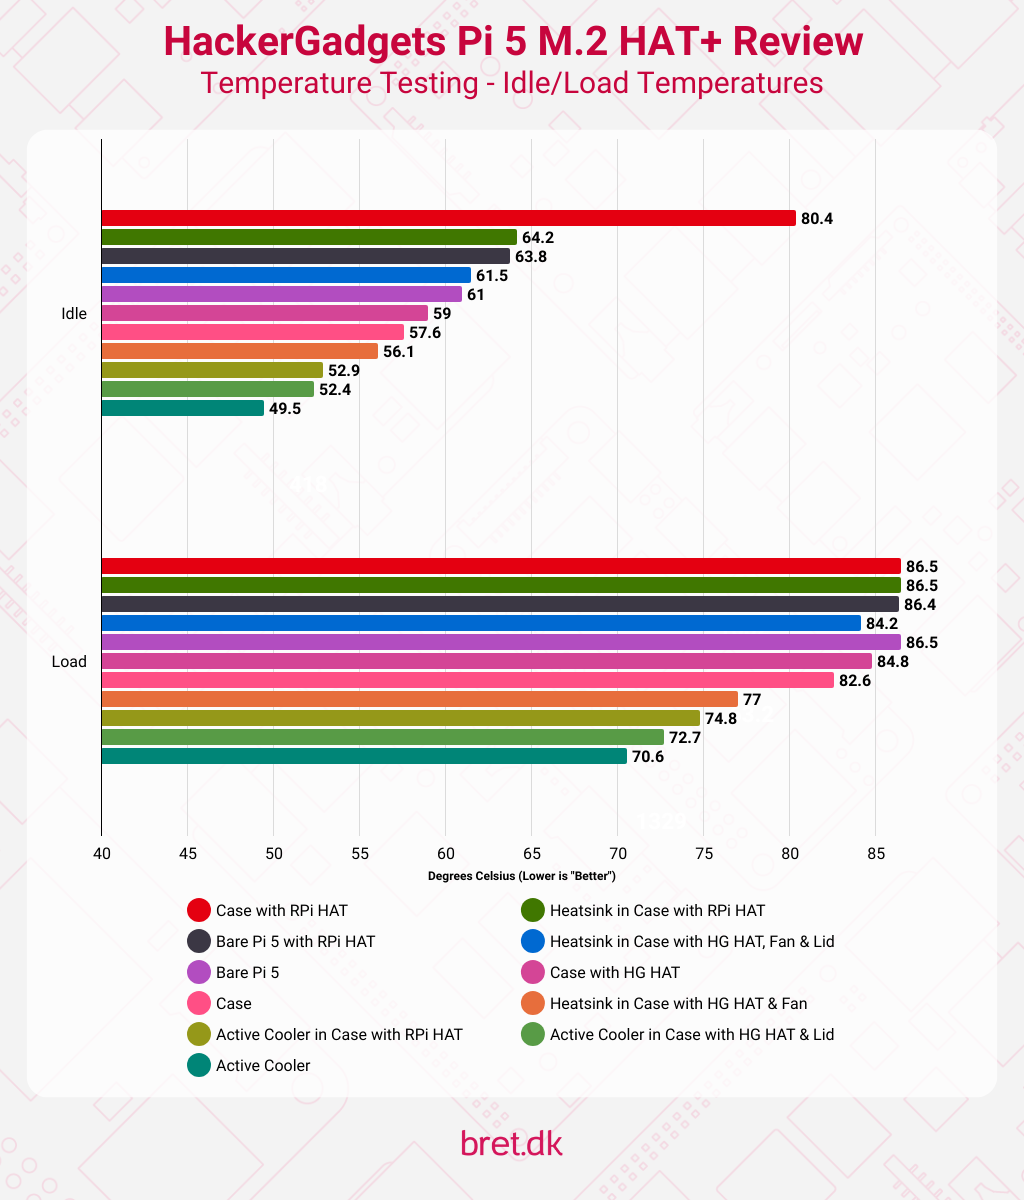
The temperatures speak for themselves really, and the HackerGadgets NVMe HAT puts up a great fight considering in 2 of these tests it had additional airflow restriction from the case’s lid being attached. With all of the official HAT+ data points, there is no case lid attached due to it not fitting.
One important thing to point out though is that with the lid on and the case fan attached to the underside of the HackerGadgets HAT, the fan was activated. The same goes for the data point with the active cooler and HackerGadgets HAT. This means that whilst the idle temperatures may look lower, this is because we’re using the default fan/temperature settings in Raspberry Pi OS to control the fan speed and the higher temperatures within the case mean that the fan ends up running.
The fan running in those instances may not be a big issue for you as it’s barely audible at that point, though the power draw will be slightly higher. It’s only at full load that you begin to hear the fan in either situation.
 The active cooler peeking from below the HAT
A final mention is to the NVMe storage itself whilst the Pi is under full load. I haven’t tested it here, but you should be aware that if you’re planning on hammering your Pi 5 with heavy loads, your NVMe SSD is likely to get quite toasty due to the temperature inside. Whether or not this impacts performance in your use case will depend, though, at those higher temperatures, you are likely to see some drops in speed/throughput. Perhaps at PCIe Gen2/3 speeds with a single lane though, this won’t be a big issue.
Where to buy the HackerGadgets Raspberry Pi M.2 HAT?
At the moment, the only place to pick up one of these HATs is HackerGadget’s online store where you’ll find the 2242 M.2 Raspberry Pi 5 NVMe HAT at an entirely reasonable $12.99! This excludes shipping and any potential taxes, so do factor that in.
Overall Thoughts
I feel like I’m repeating myself but to sum it up one final time, this HAT feels like the solution Raspberry Pi should have come up with themselves. It fits in the official case and allows you to use the fan that comes with it, preventing most throttling, and if you want to use the active cooler, it gives it an extra couple of degrees of headroom, even with the case’s lid being attached! Having metal screws that allow you to mount it in the case is a massive bonus too.
There’s the obvious problem of sourcing the HAT given they only ship from China and taxes etc are left for you to handle but if you want to have an M.2 HAT on your Raspberry Pi 5 that genuinely fits into your Raspberry Pi 5 case then perhaps it’s worth it?